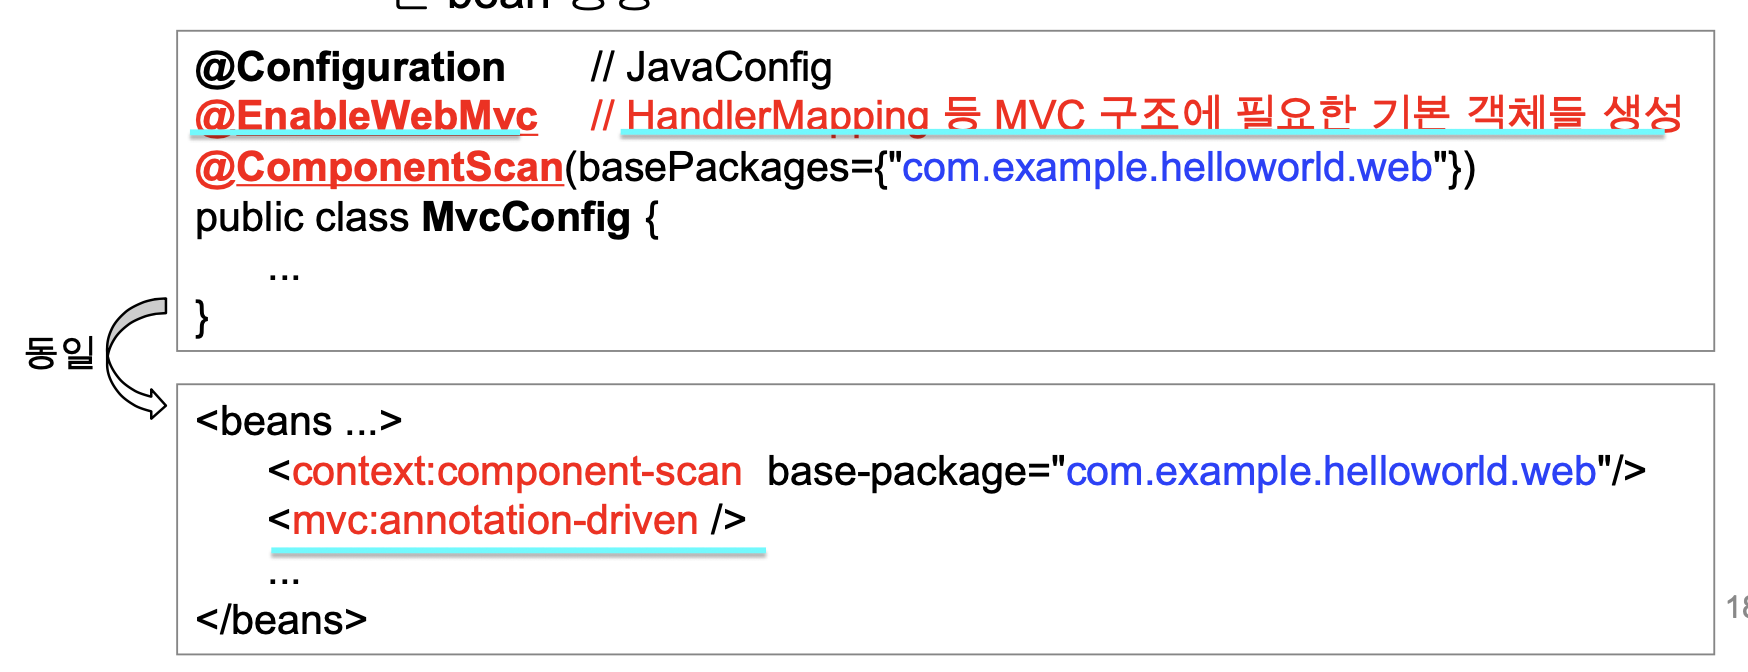
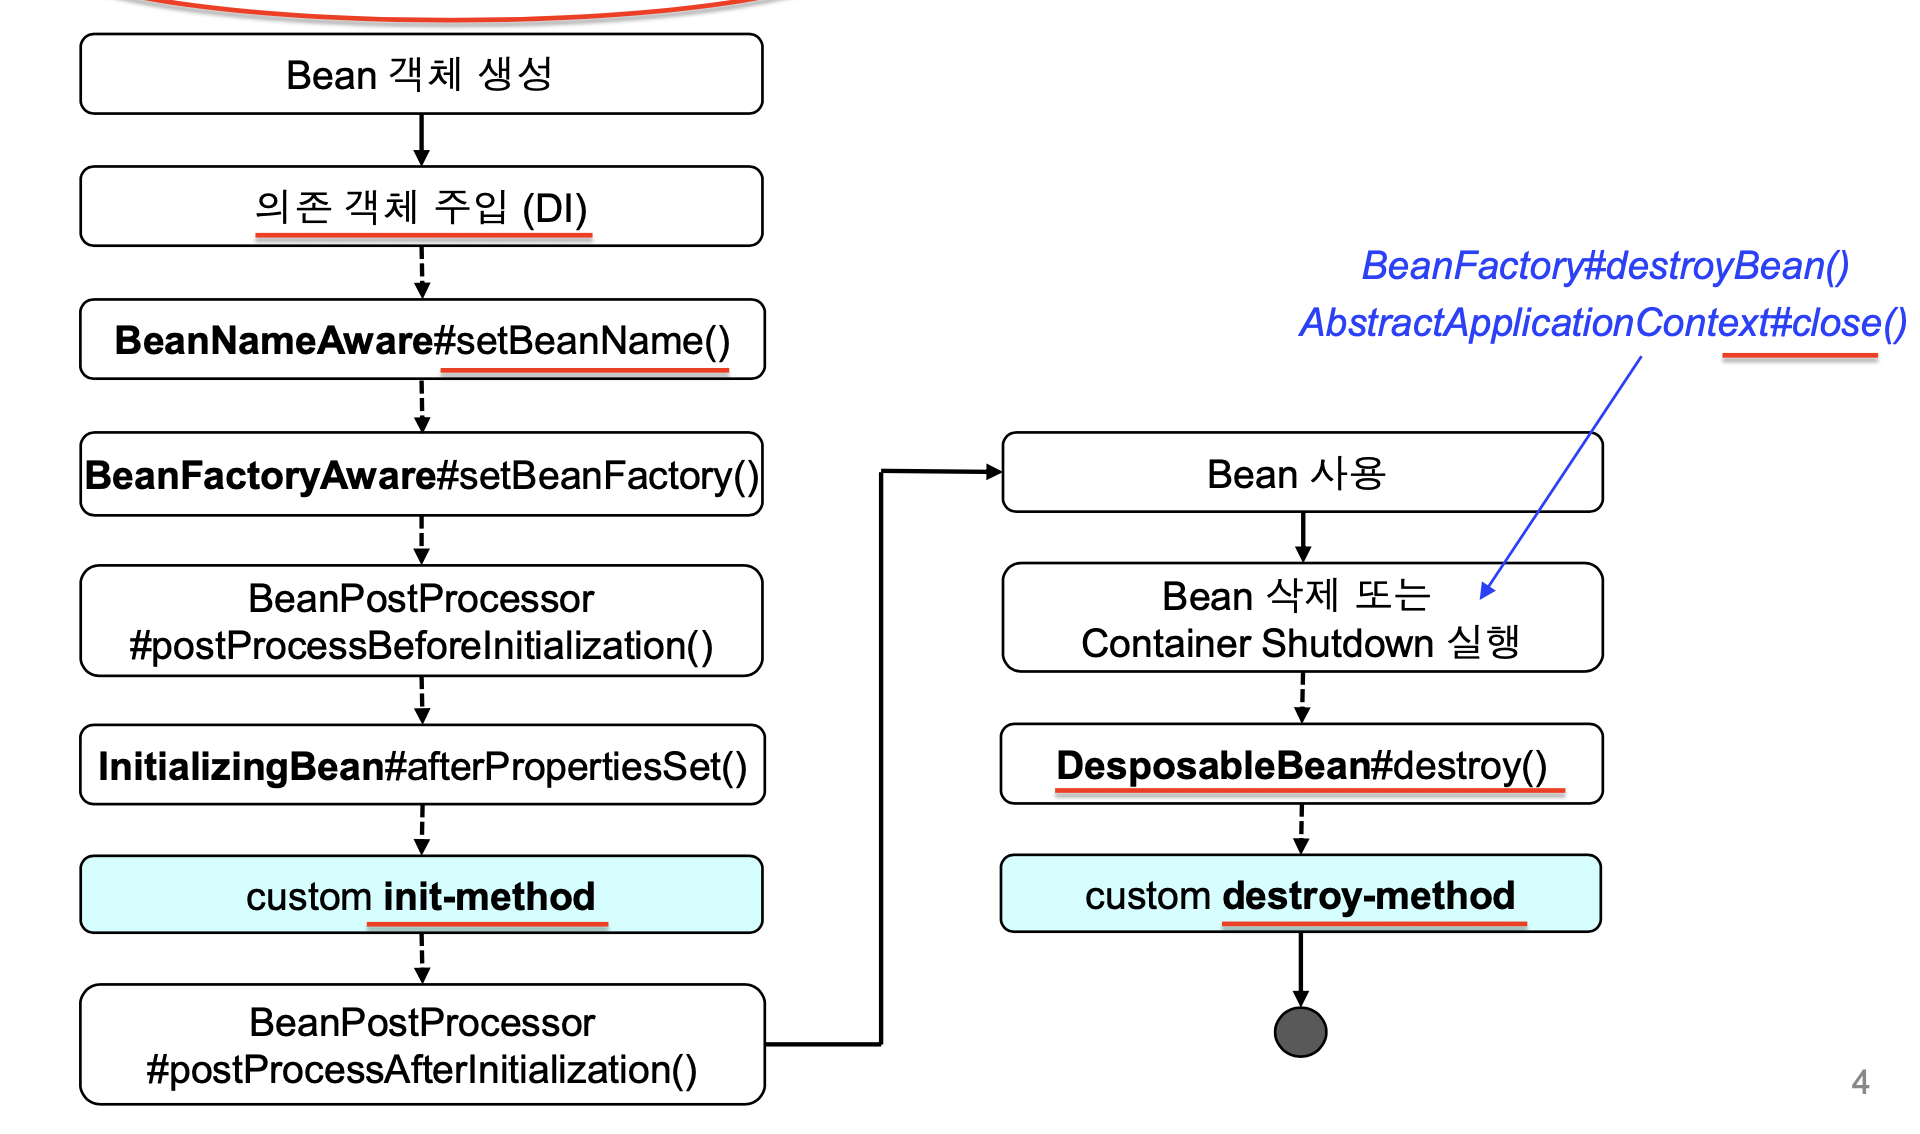
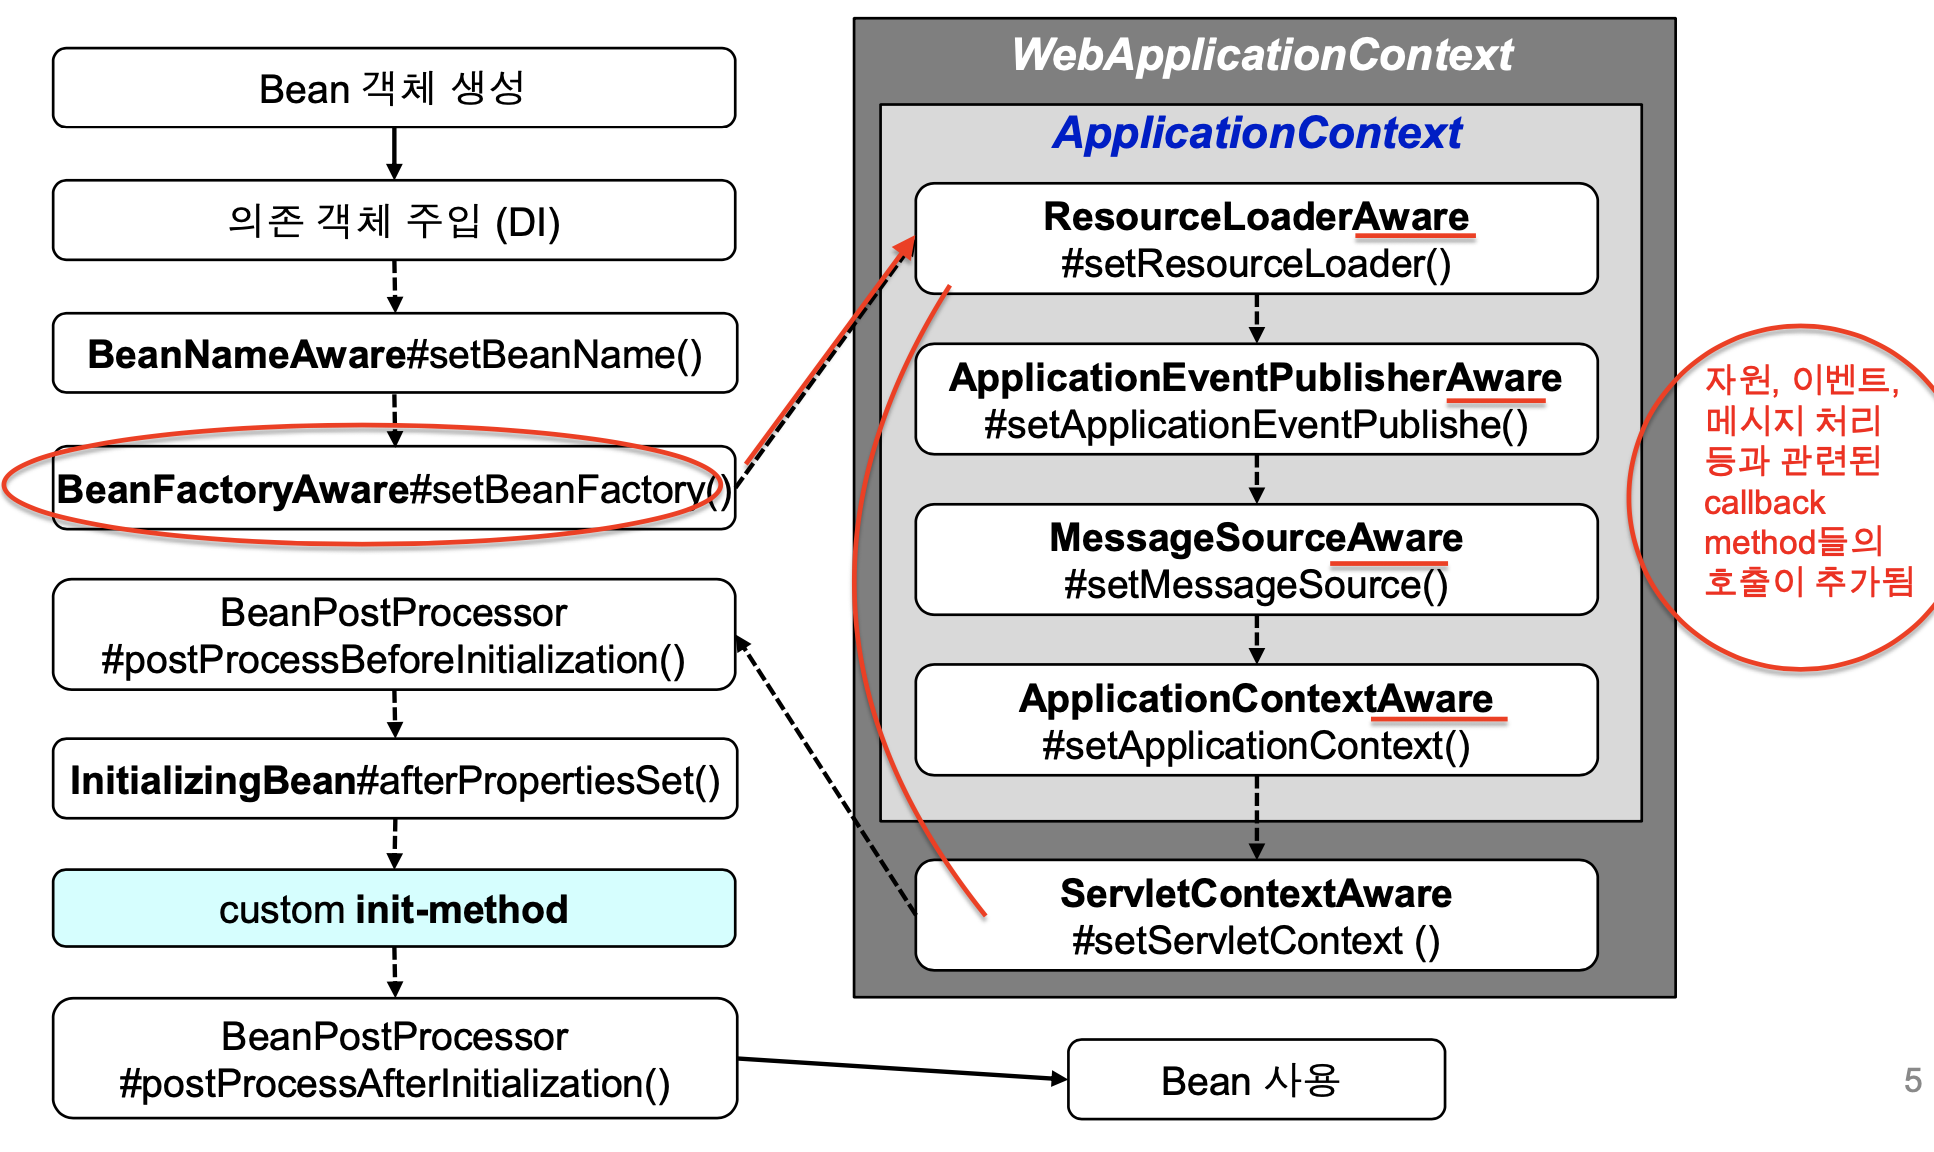
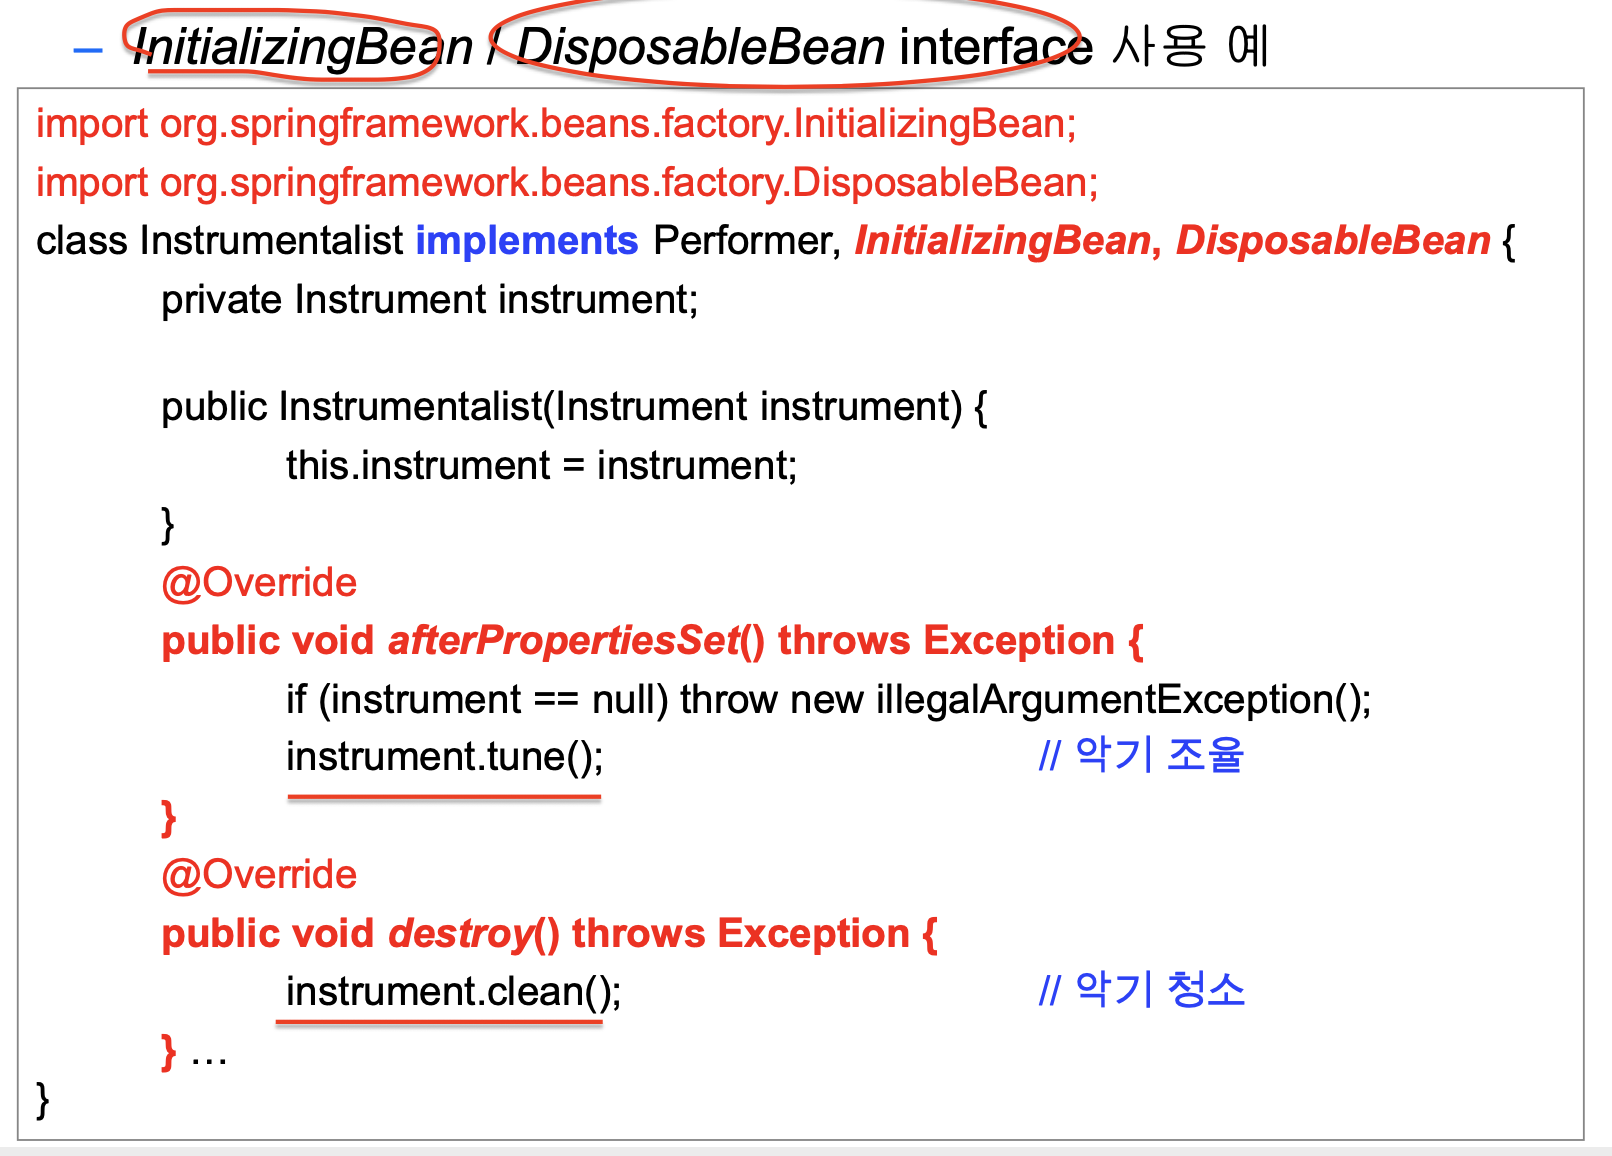
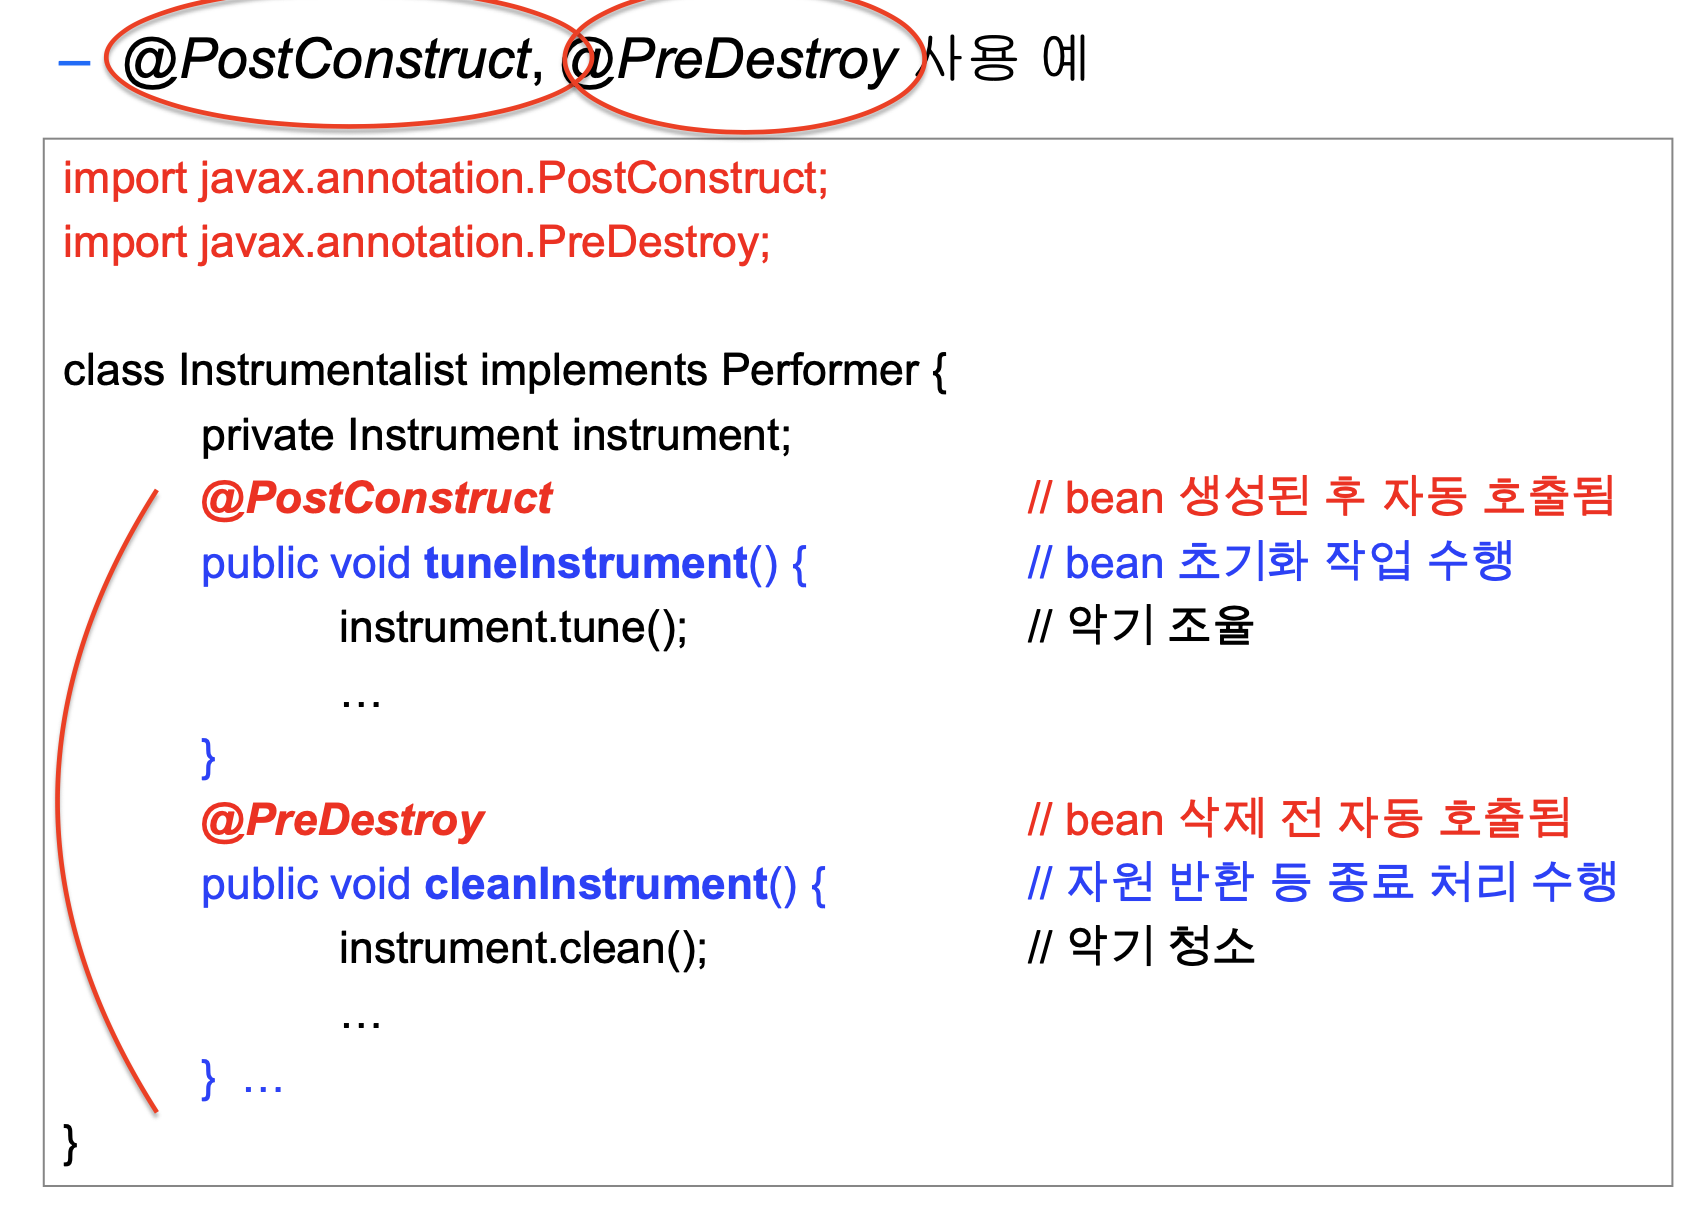
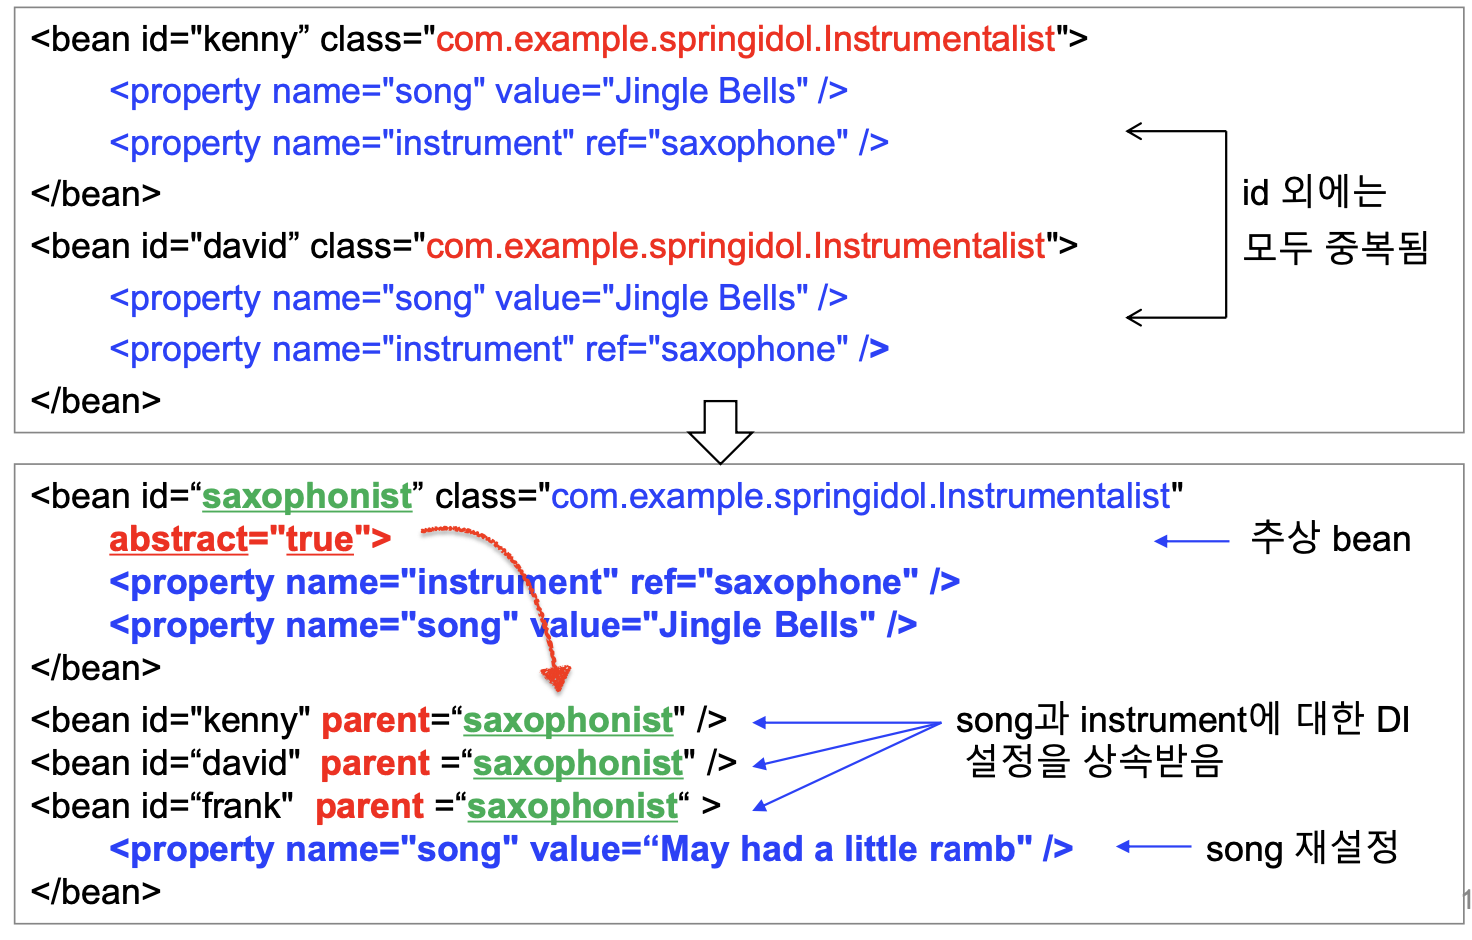
[ 정렬의 종류 ]
재귀를 이용하지 않는 정렬
1) Selection Sort(선택정렬)
2) Bubble Sort(버블정렬)
3) Insertion Sort(삽입정렬)
재귀를 이용하는 정렬
4) Merge Sort
5) Quick Sort
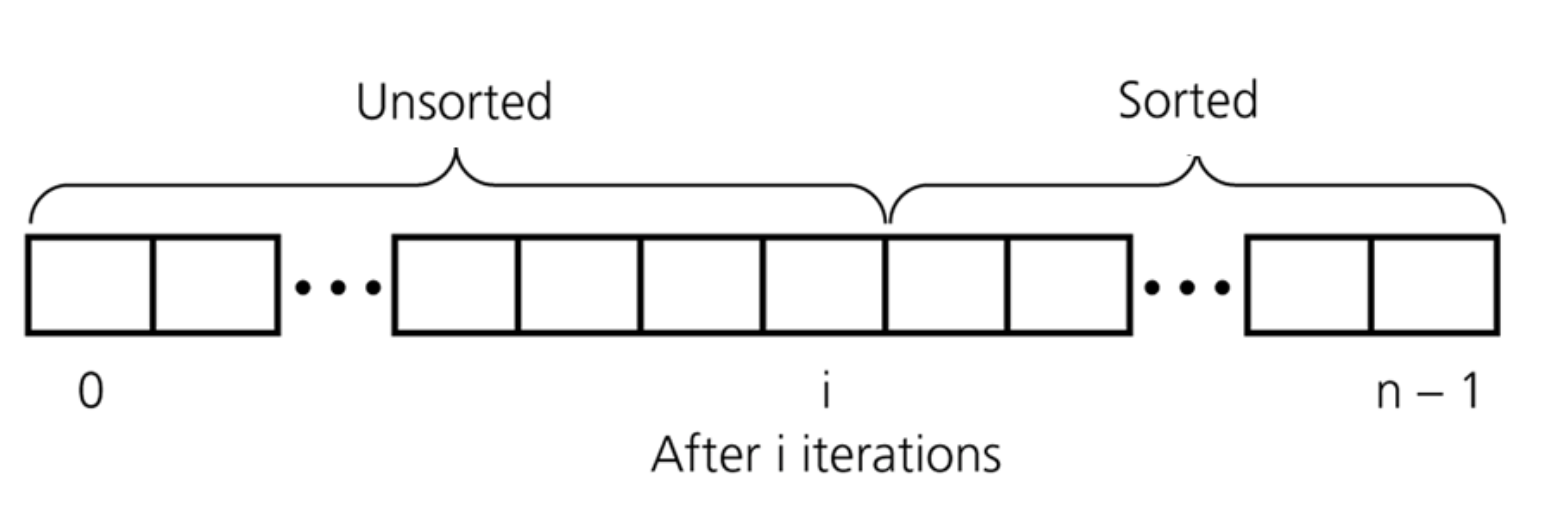
1. Selection Sort
가장 큰 값을 찾아 맨 오른쪽으로 보낸다.

ex) 학생의 성적을 정렬하는 프로그램
학생은 학번, 영어, 수학, 국어 성적을 가지고 있음
국어 성적을 기준으로 내림차순 정렬 (selection sort)
#include <stdio.h>
#include <stdlib.h>
#include <time.h>

struct Student {
    int stu_id;
    int eng;
    int math;
    int korean;
};

struct Student* selectSort(struct Student *arr_std, int n){

    int i, j, max, maxId;
    struct Student tmp;

    for(j=0; j<n-1; j++){
        max = arr_std[0].eng;
        maxId = 0;
        for(i=0; i<n-j; i++){
            if(arr_std[i].eng > max){
                max = arr_std[i].eng;
                maxId = i;
            }
        }
        tmp = arr_std[n-1-j];
        arr_std[n-1-j] = arr_std[maxId];
        arr_std[maxId] = tmp;
    }

    return arr_std;
}

int main(void) {

    int n, i;
    scanf("%d", &n);

    struct Student *arr_std = (struct Student *)malloc(sizeof(struct Student) * n);

    int stu_id_first = 20210001;
    srand((unsigned)time(NULL));

    for(i=0; i<n; i++){
        arr_std[i].stu_id = stu_id_first + i;
        arr_std[i].eng = rand() % 101;
        arr_std[i].math = rand() % 101;
        arr_std[i].korean = rand() % 101;
    }

    arr_std = selectSort(arr_std, n);

    for(i=0; i<n; i++){
        printf("%d %d %d %d\n", arr_std[i].stu_id, arr_std[i].eng, arr_std[i].math, arr_std[i].korean);
    }

    return 0;
}
2. Bubble Sort
두 개 중에 큰 값을 오른쪽에 배치한다.

3. Insertion Sort (삽입정렬)
왼쪽부터 한 숫자씩 선택하면서 자리를 찾고 바꾼다.

#include <stdio.h>
#include <stdlib.h>
#include <time.h>

int* insertSort(int *arr, int n){
    int i,j,tmp;

    for(i=1; i<n; i++){
        for(j=0; j<i; j++){
            if(arr[j] > arr[i]){
                tmp = arr[j];
                arr[j] = arr[i];
                arr[i] = tmp;
                continue;
            }
        }
    }
    return arr;
}

int main(void) {

    int i,n;
    scanf("%d", &n);

    int *arr = (int *)malloc(sizeof(int) * n);
    srand((unsigned)time(NULL));


    for(i=0; i<n; i++){
        arr[i] = rand() % 100;
        printf("%d ",arr[i]);
    }
    printf("\n");

    arr = insertSort(arr, n);

    for(i=0; i<n; i++){
        printf("%d ",arr[i]);
    }
    printf("\n");
    return 0;
}
4. Quick Sort
평균 수행시간 : nlogn
최악 수행시간 : n^2


1) j는 0부터 n-1까지 돈다.
2) 값이 젤 오른쪽 값보다(pivot) 작으면 i와 j 위치의 값을 서로 바꿔준다. i++
3) j loop가 끝나면 i와 pivot 자리의 값을 바꾼다.
#include <stdio.h>
#include <stdlib.h>
#include <time.h>

int partition(int *arr, int s, int e){

    int i, j, tmp;

    i = s;
    for(j=s; j<e; j++){
        if(arr[j] < arr[e]){
            tmp = arr[j];
            arr[j] = arr[i];
            arr[i] = tmp;
            i++;
        }
    }

    tmp = arr[e];
    arr[e] = arr[i];
    arr[i] = tmp;

    return i;
}


void quickSort(int *arr, int p, int r){
    int q;

    if(p < r){
        q = partition(arr, p, r);
        quickSort(arr, q+1, r);
        quickSort(arr, p, q-1);
    }
}

int main(void) {

    int n;
    scanf("%d", &n);

    int *arr = (int *)malloc(sizeof(int) * n);

    int i;
    srand((unsigned)time(NULL));

    for(i=0; i<n; i++){
        arr[i] = rand()%100;
        printf("%d ", arr[i]);
    }
    printf("\n");

    quickSort(arr, 0, n-1);


    for(i=0; i<n; i++){
        printf("%d ", arr[i]);
    }
    printf("\n");

    return 0;
}
5. Merge Sort
1) 반으로 반으로 끝까지 나눈다.
2) 나눠진 두 그룹을 합치면서 정렬한다.
3) 나눴던 것들을 계속 합치면서 정렬한다.

합할 때는 i = s, j = q + 1, t = s 로 시작해서
arr[i] 와 arr[j] 중에 더 작은 것을 새로운 배열에 넣는다. 이 때 새로운 배열의 인덱스는 t이다.

#include <stdio.h>
#include <time.h>
#include <stdlib.h>

void merge(int *arr, int s, int q, int e, int n){
    int *new_arr = (int *)malloc(sizeof(int) * n);

    int i = s, j = q+1, k = s;

    while(i <= q && j <= e){
        if(arr[i] > arr[j]){
            new_arr[k++] = arr[j++];
        } else {
            new_arr[k++] = arr[i++];
        }
    }

    while(i <= q){
        new_arr[k++] = arr[i++];
    }
    while(j <= e){
        new_arr[k++] = arr[j++];
    }

    for(i=s; i<=e; i++){
        arr[i] = new_arr[i];
    }
}

void mergeSort(int *arr, int s, int e, int n){
    int q;
    if (s < e){
        q = (s + e) / 2;
        mergeSort(arr, s, q, n);
        mergeSort(arr, q+1, e, n);
        merge(arr, s, q, e, n);
    }
}

int main(void) {
    int n;
    scanf("%d", &n);

    int *arr = (int *)malloc(sizeof(int) * n);
    int i;
    srand((unsigned)time(NULL));

    for(i=0; i<n; i++){
        arr[i] = rand()%100;
        printf("%d ", arr[i]);
    }
    printf("\n");

    mergeSort(arr, 0, n-1, n);


    for(i=0; i<n; i++){
        printf("%d ", arr[i]);
    }
    printf("\n");


    return 0;
}
* 퀵 소트는 먼저 정렬을 하고 나서 나눠가는 방식인데 비해, 머지 소트는 먼저 나누고 정렬을 해 나간다.
'Computer Science > Data Structure' 카테고리의 다른 글
| [알고리즘] 최소신장트리(MST) / 크루스칼 / 프림 (0) | 2021.05.31 |
|---|---|
| [문제해결기법03] 동적 메모리 할당 (0) | 2021.04.23 |
| [문제해결기법02] 뽑기 - 조합/순열 (0) | 2021.04.23 |
| [문제해결기법01] 순환(재귀) recursion (0) | 2021.04.07 |
| 자료구조 4 탐색 (0) | 2020.12.10 |